Want to know the steps that can be followed to export intuit online payroll transactions to QuickBooks for windows or Mac? Well, we have a solution for you, you can use the steps below to set up and use the export function from Intuit full-service payroll and intuit online payroll to QuickBooks pro/premier or QuickBooks enterprise. The user can set up export and then import to QuickBooks desktop. And later backup the QuickBooks desktop file.
We will be discussing the process in detail, later in this article. Kindly read the article carefully, or call us at +1-844-239-3583, and let our team professionals carry out the process on your behalf.
Read Also: How to configure QuickBooks Firewall for Multi-user Mode in QuickBooks?
Steps to set up export of payroll information into QuickBooks Desktop
The user can follow the below steps to setup exporting of payroll information into QuickBooks desktop.
For intuit Full Service payroll
- The user needs to first move to the account settings and then choose set up now tab in the export to QuickBooks section.
- After that, choose the accounting software that the user needs to export the payroll transactions to:
- QuickBooks desktop for windows
- Intuit QuickBooks online
- QuickBooks desktop for mac
- The user is suggested to select continue tab.
- And select the account to export to:
- The user is provided with three options for mapping expenses accounts. The liability accounts don’t have this option.
- It is recommended to use only alphabetical characters and numbers in account names. In case you have special characters listed in the account names in QuickBooks, then you will have to remove them in order to successfully export from intuit full service payroll.
- If the user is using subcategories or sub accounts, then using a colon to separate the category name from the subcategory.
- In case the user s using the account numbers in QuickBooks, then it is suggested to avoid entering an asset account.
- If you are using the account numbers in QuickBooks, then do not enter the account number in the account name.
- Or if you are using a cash advance or employee loan deductions, then entering an asset account is suggested.
- In case of the cost of goods sold accounts for expense accounts, the user is suggested to contact payroll support to enable this functionality.
- After the user has reached the review page, he/she is suggested to review the mapped accounts for accuracy and then click on finish tab.
It should be noted that if you create manual paycheck or tax payment entries for existing information in intuit full service payroll, then the system will itemize paychecks and tax payments a certain way, so it is important to use export file to ensure easy reconciliation and avoid costly errors.
You may also read: How to Fix QuickBooks Error OL-301 or OL-393?
Steps for intuit online payroll
The online payroll user will use the export preferences page to enter the QuickBooks accounts. And using the exact names of the QuickBooks accounts for the payroll data is recommended.
- The user needs to first move to setup
- Then, in the payroll and services section, choose preferences
- The next step is to select the QuickBooks desktop for windows as the accounting softwre
- Click on next
- Now, in the checking account field, the user is suggested to enter only the name of the bank account exactly as it appears in the QuickBooks chart of accounts
- The next step is to select ok tab and the default accounts listed will be created automatically in the QuickBooks software. In case you already have the accounts created specific for payroll transactions, then choose customize to enter the account names
- When entering the accounts, make sure to read the help topics to each field and select the right account type. In the general tab, enter an expense account for the wage and tax categories. For the liability accounts, the user is suggested to enter the corresponding QuickBooks liability account.
- In case you use different accounts for different groups of employees, choose that the option is the wage category section to enter QuickBooks accounts for each employee.
- In case the user is making use of different accounts for different types of wages, choose that option in the wage category section to enter the accounts for each pay type and tax type.
- The user will also need to set up the following as necessary:
- Specify if you use classes in QuickBooks.
- It is suggested to print paychecks in Intuit online payroll.
Read Also: How to Re-sort Lists in QuickBooks Desktop?
Importing to QuickBooks desktop
The user is suggested to follow the steps to import information in QuickBooks desktop. The steps involved in here are as follows:
- Retrieving the IIF files from the payroll software is recommended using the steps.
- And then use the IIF import process in order to place the transaction information into QuickBooks desktop.
In case the user is making use of the right networks to run QuickBooks, then the following process can be used:
Intuit full service payroll
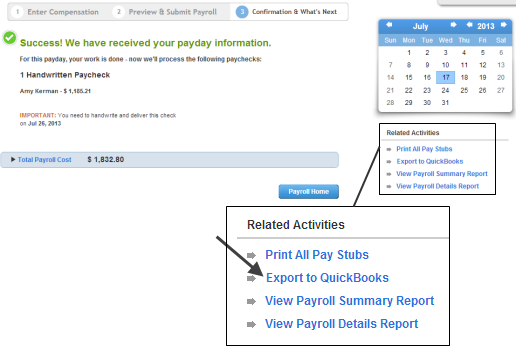
- Choose the export to QuickBooks option from the payday success or home page

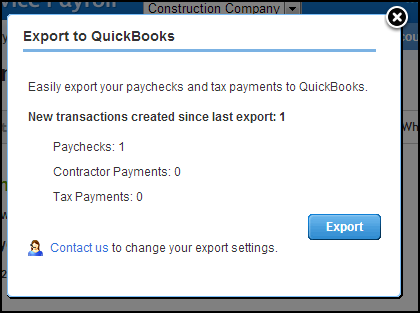
- A window will be seen with the number of paychecks and taxes that are included in the export file and select export to generate the IIF files

- The next step is to select save and save the file to the system.
For intuit online payroll
- The user is suggested to first move to the payday and select the paycheck list
- After that, in the export section, choose preferences
- The next step is to select the paychecks that the user wishes to export and then select export tab
- This will download the IIF files automatically
- The file will show at the bottom of the browser.
- The user can now proceed in importing the IIF files into QuickBooks
Steps for importing the file into QuickBooks desktop
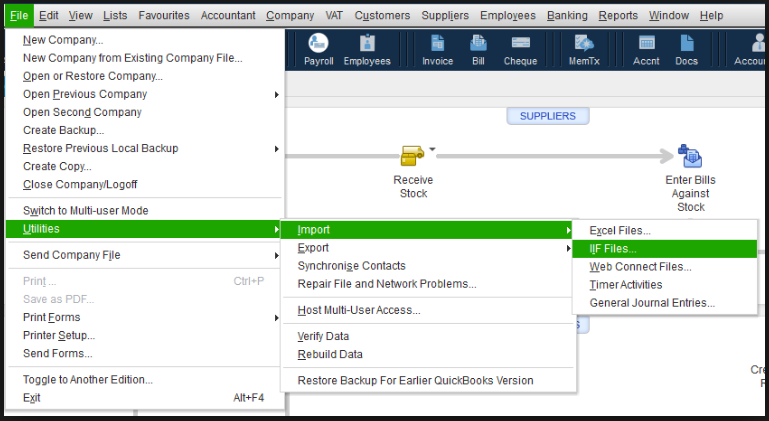
- If you are a windows user, then you are suggested to select file and utilities tab from QuickBooks desktop. After that click on import tab and the IIF files

- For mac users, selecting file and import from IIF is suggested from QuickBooks desktop. The user will be suggested to back up the QuickBooks company file before continuing. The user can also click on cancel backup to skip this step. In case the user skips the backup in this step, the software will provide a list where the user can locate the iif file. Also, opening the file is suggested after which a message would be seen stating that the import is successful.
It should be noted that the intuit doesn’t offer assisted technical support for creating or importing IIF files.
You may also like: How to Resolve the QuickBooks Error 1310?
Steps for moving IIF files to right networks
The user can perform the following steps to move IIF files to right networks:
- In the web browser, it is suggested to visit the rightnetworks.com and select support tab
- After that choose login to file manager
- And then login to the right networks account. In case the user is having issue in logging in, then contacting right networks support is suggested
- The next step is to select the blue arrow icon from the file manager screen
- And then select add, browse to the iif files on the system and hit open tab
- The user is then suggested to select upload tab. And the file is now stored on the right network server.
- Move to the QuickBooks software and then select the file tab and utilities tab.
- Select import and iif files
- Choose the file you just uploaded to the right networks server
- The iif file will import into QuickBooks.
Conclusion
This brings us to the end, where the user would have to backup the company file. The steps above would help in exporting Intuit Online Payroll transactions to QuickBooks for Windows or Mac (IIF). However, in case of any query, the user can contact our QuickBooks desktop support team professionals at +1-844-239-3583, and let them perform the rest of the task.


