Exporting or transferring chart of accounts to a new company file in QuickBooks permits the user to restore portable files in QuickBooks successfully. Charts of accounts is introduced in QuickBooks to save time, as it helps in keeping the records of expense accounts, items, customers, vendors, classes, etc. This feature ensures to keep the data at one place and permit you to access it anytime.
In this article, we will be learning the process to successfully transfer the chart of accounts to new QuickBooks file. Thus, if you are interested in knowing the process in detail, make sure to go through the post till the end.
You might see also: How to Set up a Clearing Account in QuickBooks Desktop?
Steps for transferring chart of accounts to a new QuickBooks file
Making a perfect company file is a major task that takes a lot of time and efforts. Transferring chart of accounts to a new QuickBooks file takes certain steps. Before you perform the export operation, make sure to create a copy of the QuickBooks file for the company. The backup copy will prove out t be quite helpful, especially if you lose any financial information from the company file during the transfer process. With this, it also becomes easy to export chart of accounts of vendors, employees, and customers. The user needs to follow the steps for exporting and importing the accounts into a new QuickBooks file.
Step 1: Exporting chart of accounts
- At first, you are required to open the QuickBooks company file.
- And then, look for the chart of accounts you wish to export.
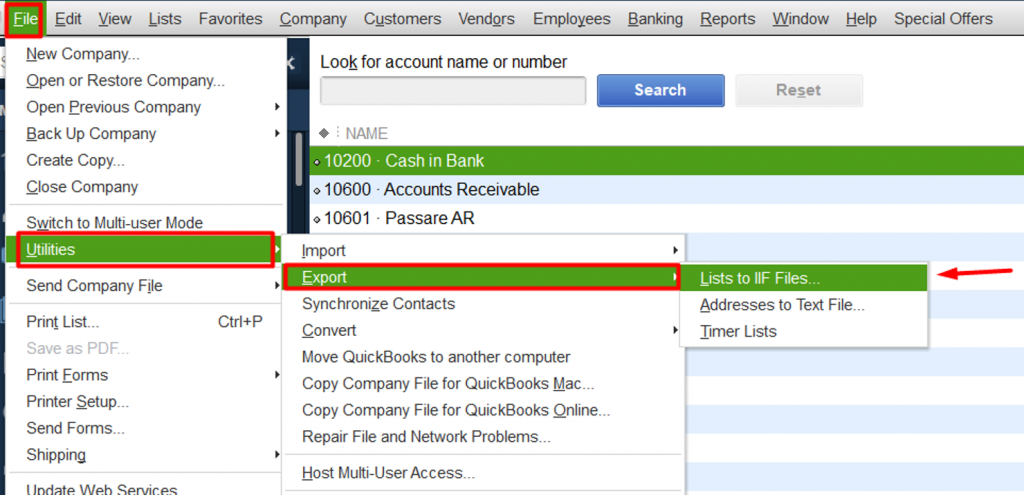
- The next step is to select file from the taskbar.
- Once done with that move to the utilities tab and select export.
- After that select lists to IIF files.

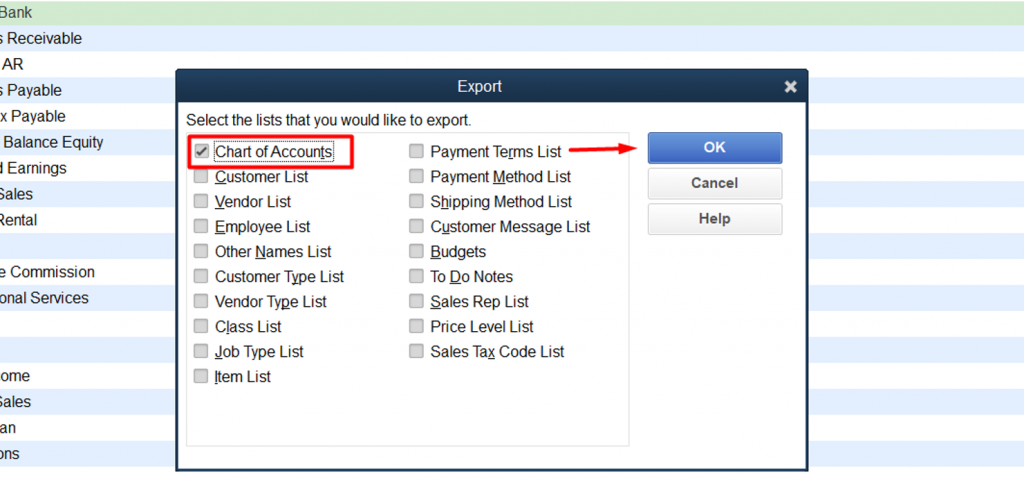
- You will see a list on your screen.
- After which you should select chart of accounts tab.

- Save as dialog box will appear on the screen.
- The last step is to save the file by selecting the location from the drop-down list.
Read also: How to Setup and Configure Email Services in QuickBooks Desktop?
Step 2: Converting the file
- Under this, you are supposed to open excel.
- And then, look for the data from the taskbar located at the top.
- The next step is to click on from text option.
- Followed by, the user will see a dialog box as import text file on the screen.
- Move to the folder where you have saved the chart of accounts.
- In case you have the previous version of Microsoft Office 2010, then look for text import wizard.
- Use it to search the preferred IIF file.
- Now, open the file and follow these steps.
- Choose the file you wish to export. Also, select the delimited option.
- Click on next.
- The last step is to select the column data format and click on general.
Step 3: Saving the file
- The user will see a small box on the screen, and the user will have to select the location for importing the file.
- And select the existing worksheet option and click on ok.
- Move to the file drop down menu and click on save as an option.
- And the file will be saved in excel sheet format.
Important tips
- The user would have to follow the export and import process of transferring information between QuickBooks files, or else there are chances of being stuck. This is very much essential to save time and efforts.
- You can create a backup of the company file, which will help you in case of any issue during the transfer process.
- Further, you must log in to the QuickBooks as the admin, to perform the import and export tasks. In case you have more than one users in the company file, then make sure that you are not in an active multi-user mode.
Read it also: Export Lists from the Old Company File Into a New Data File
Final Words..
Transferring chart of accounts to a new QuickBooks file isn’t a tough task, if the user is familiar with the steps discussed in this post. However, if you are still unable to successfully transfer chart of accounts to a new QuickBooks file, then make sure to contact our QuickBooks support team professionals at +1-844-239-3583. Our team will ensure to provide you with immediate technical assistance.


