QuickBooks is the most advanced accounting and bookkeeping software. Whether users are succeeding the small business or large, QuickBooks is the latest and extremely acclaimed software for the users. They can easily handle the market, account, payroll management, tax and other purposes with the help of this accounting software. It comes with great specialties and very helpful in enhancing market prosperously. But sometimes, the users may face some restraints while commencing the QB software due to some technical difficulties. These errors may terminate access to the software. In this blog we will discuss about Register or Activate QuickBooks Desktop.
This article will talk about how to register QuickBooks desktop and activate the software quickly. While the users install QuickBooks, it is necessary to register QB Desktop. If the users have many transcripts of QuickBooks Desktop then, they need to register or activate it all time for each copy.
This post has contributed all the necessary facts concerning the topic. It also includes some major mistakes that you may during the activation. Thus, make sure to read this post till the end, or you can also get in touch with our experts and certified professionals, who will help you in registering and activating QuickBooks desktop. Feel free to talk to us anytime, we will be happy to help you.
Read this also: How to Fix QuickBooks has stopped working problem?
Methods to Register QuickBooks desktop
Checkout the following steps to register or activate the QuickBooks desktop:
Concerning 2016 and above new versions
Checkout the following steps to Register QuickBooks Desktop for Windows versions:
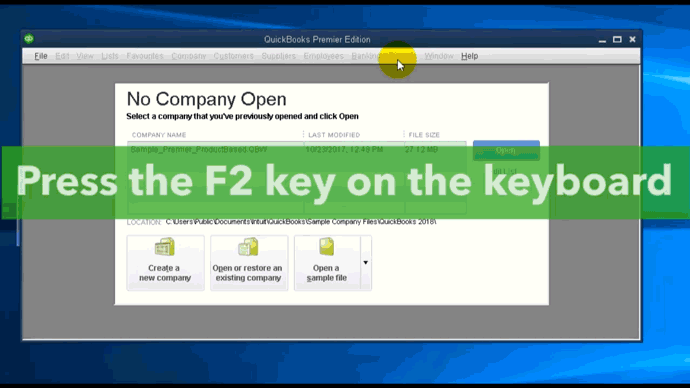
- Start QuickBooks Desktop on your network and then press the ‘F2 key‘ on your keyboard.
- Visit the ‘Stock Information’ window and on the right side of the license number lookout for the registration status.
- If it tells ‘Activated’ then you are all set to proceed with your work on QuickBooks Desktop.
If it tells ‘Not Activated’ follow the following steps:
- First, close to the ‘Product Knowledge’ window by succeeding on ‘Ok’.
- Navigate to the ‘Help’ list and then activate QuickBooks from there by choosing ‘Activate QuickBooks’ (for 2016 version it will show ‘Register QuickBooks rather of Activate QuickBooks’)
- Observe the prompts that will appear on the screen to confirm your information and complete the activation process.
Steps to Register QuickBooks Desktop for Mac
- Proceed to their menu, and then choose ‘Register QuickBooks‘.
- Now, open the ‘License number and Product number‘, then pick ‘Next‘.
- Next, choose ‘Register Online‘.
- And now, understand the on-screen instruction to complete the registration.
- If you don’t notice any register option it means that the software is previously registered.
Read it also: How to Fix QuickBooks Error Code 404?
Concerning 2015 and older versions
It is observed that in older versions, discontinued merchandise cannot be registered for the initial time. And for that, you need to re-register discontinued commodities. Moreover, the users can contact customer service provider to receive the validation code.
Concerns with registering or activating QuickBooks Desktop
You may face some difficulties while registering or activating the QB desktop. These are given here:
- Information not admitted – In this situation check again that the information you have entered is the same info you gave at the time of purchase.
- Blank Partition or Error Message – Temporarily damage your anti-virus software.
Methods to Activate the QuickBooks desktop for Windows
Checkout the following steps to activate or register QuickBooks Desktop once you have successfully installed it on your system.
It is important that you should have to activate your QuickBooks desktop after installing it on your system. QuickBooks will automatically prompt you to activate the software, but you can also activate it manually with the help of following steps:
- Firstly, you need to Open your QuickBooks desktop.
- After that choose the Activate QuickBooks Desktop option from the Help menu
- Now follow the on-screen instructions to verify your information.
After you’re finished, QuickBooks will pop up a successful message and you QuickBooks will now activated and you’re ready to go.

You may also like: How to Fix PDF and Print problems with QuickBooks Desktop?
Issue when registering and activating QuickBooks desktop
It is necessary to have the correct activation of the QuickBooks Desktop for regular functioning and task performance. Despite this, every time even after making the right steps QuickBooks activation does not appear properly. QuickBooks Validation Code is wrong, and the Product number is unreliable are some common issues related to this. The user may also encounter an error message saying the service is temporarily unavailable.
In this blog, we will explain steps to correct the ‘Incorrect Validation code‘.
Checkpoints before troubleshooting Problems
Assure that the below points are carried out properly before trying out any solutions:
- Verify QuickBooks is activated and ‘verify the license number & product code‘ match the one on the sticker on QuickBooks product package.
- For downloaded commodities, View the purchase confirmation email you got from Intuit.
- If you purchased QuickBooks on CD- See the brightly colored sticker on the original CD envelope.
What causes validation error in QuickBooks?
There are can b a plenty of reasons causing this error. A few of which are given below:
- If there is an incorrect license number, product code, or validation code.
- The regularity date is incorrectly set to a year.
- The ‘Credits‘ data is read-only.
- Destruction in Microsoft Windows OS
- Any Damage in the EntitlementDataStore.ECML file.
- ‘Microsoft .Net Framework‘ privacy settings are set too lengthy.
You may also read: How to Fix QuickBooks Error Code 12029?
Solutions for fixing the validation code issues in QuickBooks
Below are the latest methods to fix QuickBooks validation code error:
Method 1: Monitor and confirm the system date and time settings are correct
- Firstly, Close the QuickBooks Desktop
- Next, right-click the display in ‘Window Task Bar‘, and pick ‘Adjust Date/time.’
- Choose the ‘Date & Time’ and keep the date for the current
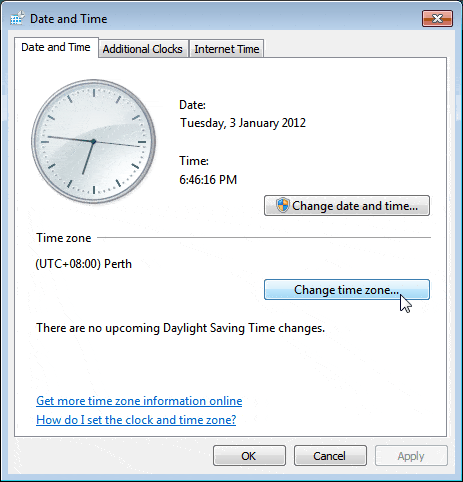
- Take ‘Apply’ and click ‘OK‘.
- Now Start QB Desktop and preferred ‘Help >> Activate QuickBooks >> Start Activation‘ (if you have a Canadian variant of QB, next click ‘Help >> Register QuickBooks >> Start Registration‘)
- Following, Type in the validation code and select ‘Next‘.
Read Also: Methods to solve QuickBooks error code 6175?
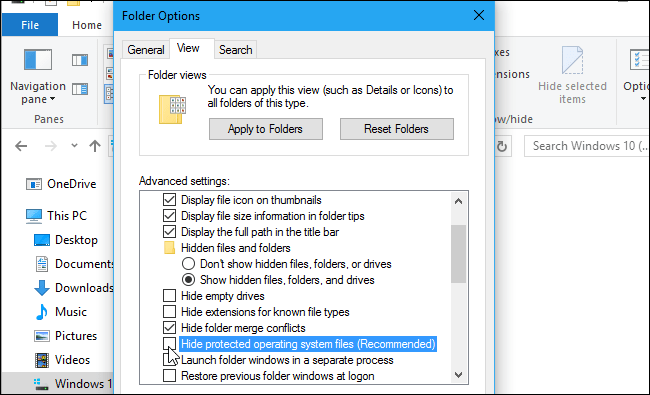
Method 2: Correctly check the read-only status of the file
- Preserve OS files and hidden files by the following steps:
- Open my ‘Network‘ and Select ‘Tools and Folder Options‘.

- In the ‘Folder Options‘ window, click the ‘View tab‘ and in the advanced settings list, choose the ‘Show hidden files and folders option‘.
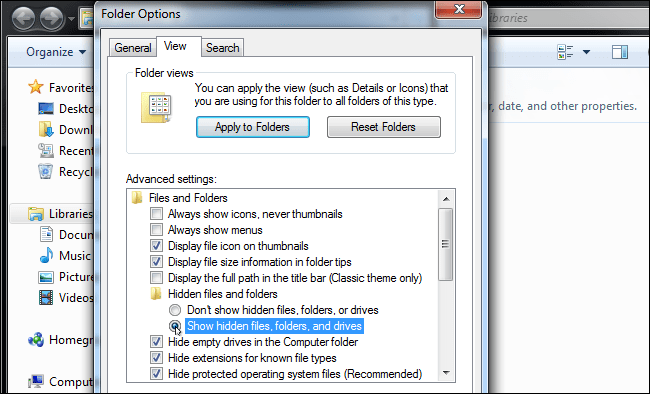
- Select the ‘Hide protected OS files‘ to clear them and click ‘OK‘ button.
- Search to the appropriate file below for your operating system
- Find the file and right-click the file and select ‘Properties‘.
- In the ‘Properties window‘, go to the Read-only box. If the box is checked, click the box to uncheck and ‘OK‘ button.
- Open ‘QuickBooks > Help > Register QuickBooks‘.
Method 3: Reactivate the MSXML
For 64- bit working system:
Use the below-given commands to activate MSXML.
- Allow to ‘Start Menu‘ and type ‘cmd.’ Ensuing is to right-click ‘Run as Administrator.’
- While you are at the C: prompt, then start ‘cd\windows \ syswow64‘
- Click ‘regsvr32MSXML 4.dll’ and tap ‘Enter‘ key.
- Tap ‘regsvr32MSXML 6.dll’ and press ‘Enter‘ key.
For 32 Bit Operating System:
Register MSXML with the below commands.
- Start ‘Run’ window and choose ‘Windows key + R’ on the keyboard.
- Tap ‘cmd’ and press ‘Enter‘ key.
- Click ‘regsvr32.exe / i msxml4.dll’ and press ‘Enter‘ key.
- Tap ‘regsvr32 MSXML 6.dll’ & press ‘Enter‘ key.
Method 4: Reset the new ‘EntitlementDataStore.ECML file’
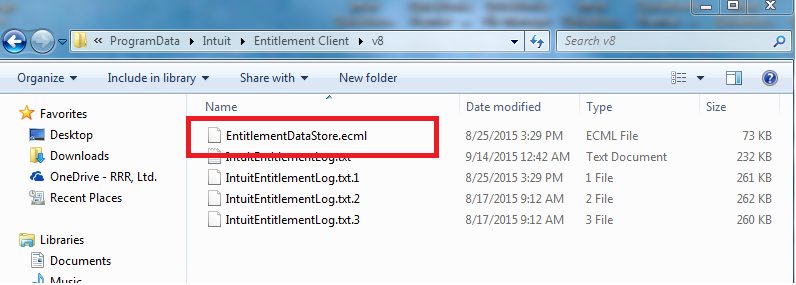
- Log in as the ‘Windows Administrator‘ on your computer.
- Allow to ‘Start > Run> Open field‘ and enter the appropriate command for your version of QuickBooks.
- If the data is missing then, proceed to method 6.
- If the file is present then, delete it.
- Open ‘QuickBooks > Help > Register QuickBooks‘.
Method 5: Re-Install by completing QB Clean Install

While QuickBooks Desktop function is damaged, and just easy reinstallation of QB desktop does not amend the issue then it becomes necessary to Uninstall QuickBooks Desktop, rename the installation data that are left behind and Reinstall QuickBooks Desktop. This method is called as ‘QuickBooks Clean Install’ Refer to the link here for complete steps.
- In case you get a message that says- Overwrite Protection – Do you need to overwrite this file as it is already in use? You can succeed ‘Yes’ for these. The data are in the Temp directory and can be overwritten without any damage to other programs.
- Assure Installation wizard is for the correct year & version.
- Shut down the QuickBooks Installation Window
- Examine the Blue & Gray icon for the QB Installer on the desktop
- Now double-click the image to begin the Installation
- During the Installer extracts files, then take ‘Yes to All’ when asked to overwrite the existing files.
See it also: How to Fix QuickBooks Unrecoverable Error?
Method 6: Close all the versions of QuickBooks
- First, click ‘CTRL+Alt+Delete‘ keys and succeed ‘Start Task Manager’
- Tap the ‘Processes tab’
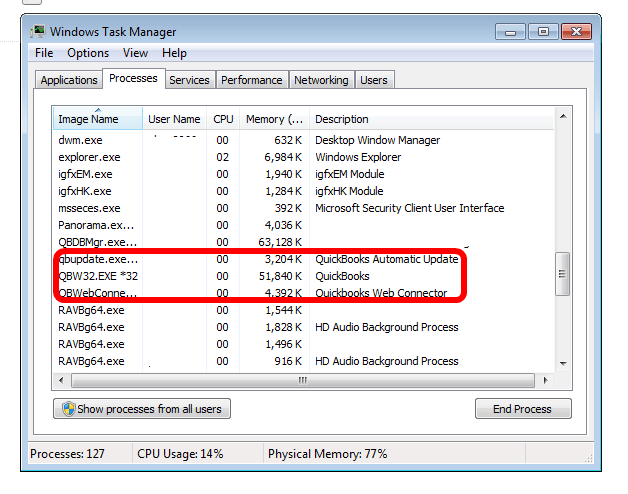
- Now take ‘Image name’ to sort processes alphabetically.
End any of the methods that are given in the following list:
- QuickBooks Messaging.exe
- Any other enduring processes that start with QB.
- Close the ‘Task Manager’ tab.
- Now Install the QuickBooks.
Method 7: Create a new Windows Admin
On Windows 10:
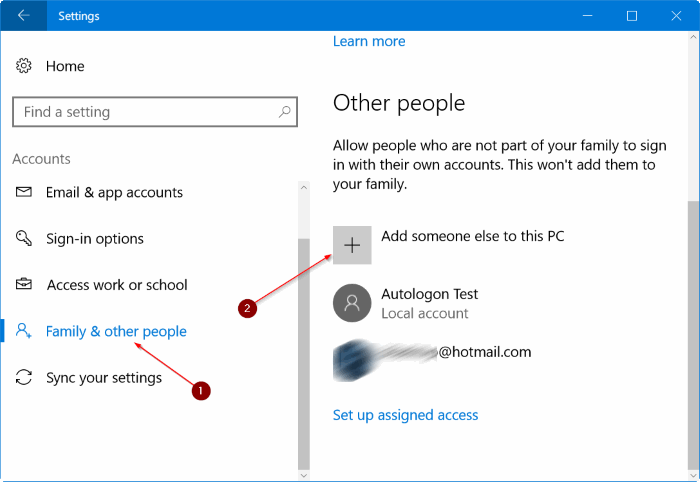
- Firstly, click on ‘Start‘ and choose the control panel.
- Next, choose ‘Accounts’ and click ‘Users account’
- In Other users, agree ‘Add someone else to this’
- At the rear of the page, take ‘I do not have this person’s sign-in’
- Now, at the bottom of the next page, choose ‘Add a user externally a Microsoft Account.’
- Write the name of the new account.
On Windows 8:

- First Start the Computer Window and hold ‘Windows+E’ keys on the keyboard.
- Choose the ‘Computer’ option and Click ‘Open Control panel’
- Now choose ‘User Accounts’ and click ‘Manage another’
- During the Manage account Window opens, and then choose ‘Add a new user in the PC frames.’
- Now open the ‘Username & domain name’ and click ‘NEXT‘
- Prefer ‘Admin access’ for the new user.
- Once you have built a new user, sign out of Windows & then sign back as a new user.
On Windows 7:
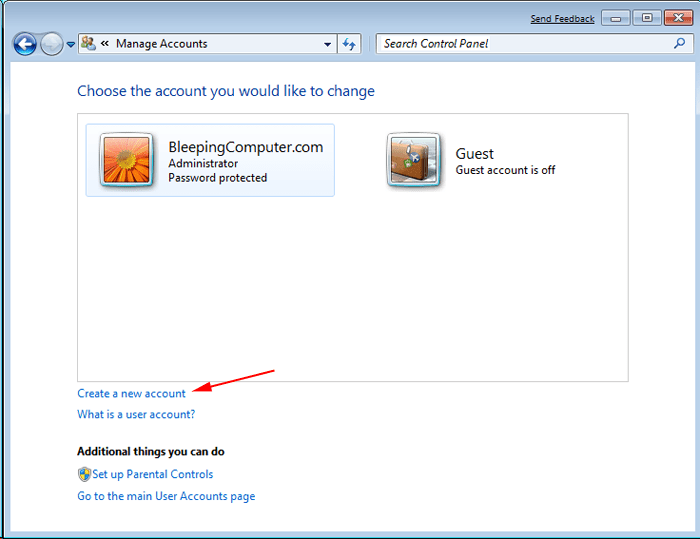
- Go to the ‘Windows start’ option and select ‘Control Panel ’
- Prefer ‘User Accounts’ and then select ‘Manage User accounts.’
- During the ‘User accounts’ window opens, then choose “create a new account‘.
- Fill in the ‘new user name’ and the domain name and tap Next option
- Choose ‘Administrator access’ for the new user, select “create account“.
- Done.!
Conclusion!
We highly recommend you to use the accounting software QuickBooks Enterprise to make your business more successful. We believe that this article will make you know all the processes to Register or activate the QuickBooks Desktop.
If by any chance you are incapable to register on your own, are facing any kind of difficulty or have any queries regarding QuickBooks do not hesitate to contact QuickBooks premier support team for expert advice on your issue. You can reach us at our help-desk number i.e. +1-844-539-0188 (toll-free). Our professionals are always there for you, so do not hesitate in calling us anytime.