Are you looking for the exporting lists from a QuickBooks company file to another? If yes, then this article will be pretty much helpful to you. The steps provided in this article related to the export lists from the old company file into a new data file, are based on the assumption that the user has already created a new company file. Thus, make sure to create a new company file, before you start with the procedures mentioned in this article.
Read this article carefully for further assistance. Or you can also get in touch with our certified ProAdvisors and experts, who will help you in exporting QuickBooks lists from the old QuickBooks company file to new data file without any issue. Give us a call right away at +1-844-719-2859, and leave the rest on us.
Important points
Before you dig in deep, make sure to go through these pointers:
- It should be taken into consideration that importing damaged lists to the company file will damage the file.
- In case the user is importing lists to an existing file or you already added information to the new company file, you need to ensure that you create a backup first.
- Moreover, the steps discussed later will only import lists. For moving transactions, it is recommended to use batch entry or a third-party software.
Related Article: Steps to Convert a QuickBooks for Windows file to QuickBooks for Mac
Steps to export lists from old QuickBooks company file
The below steps can help you in exporting lists from old company file. So, let us check out each of the steps one by one:
Step 1: Export List
The important point here is that, exporting the list from QuickBooks will create an .IIF file, which can be opened on notepad or excel. The user can export the major lists one at a time to prevent any issues.
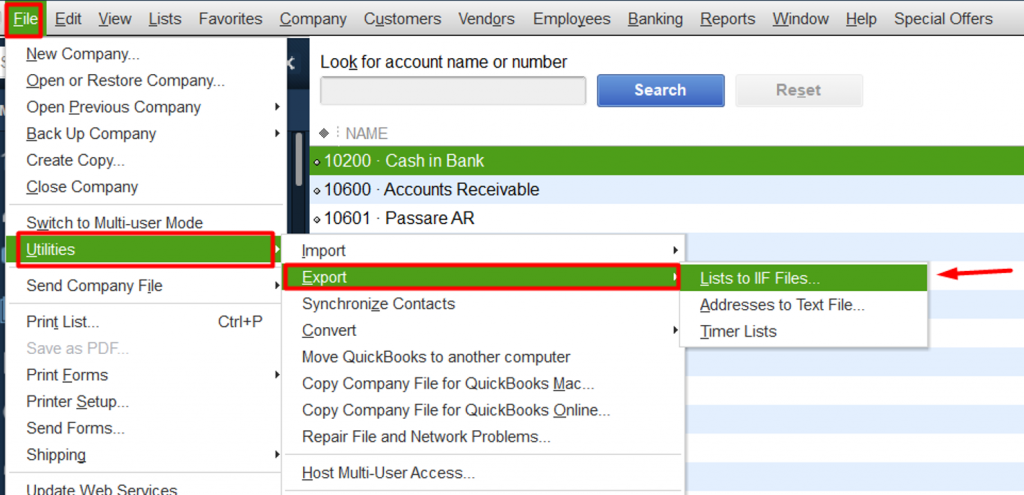
- So, the user will have to select utilities tab from the file menu
- And then choose the export option
- Also, the lists to IIF files

- After that, choose the list to be exported and click on ok tab
- Now, the user should browse the location where he/she wishes to save the file and click on save.
Step 2: Cleaning up the lists
- The user can remove the customer to whom he/she no longer sell.
- Or the vendors from whom you no longer purchase
- The user can remove the employees who left
- Or the items that are not sold any further
- The first step to be followed is to open the IIF file exported from the company file in excel:
- For that open Microsoft excel
- And then from the file menu, choose open
- Now, select the located where the file is saved
- And then, in the file type field select all files option
- The user will then have to click and open the IIF file
- After that click twice and choose finish tab in the text import wizard. The IIF file is now opened in MS excel.
- In the next step, the user needs to make the edits required using MS Excel
- And also, save the changes
- For which, one can move to the file menu and select save. Also, choose the office tab
- And then, click on yes to the prompts that appears
- Now, exit the excel
- And also, click on don’t save
Read it Also: Resolve the Network Issues with QuickBooks File Doctor test Results
Step 3: Import the list
Once done with the steps above, the user needs to import the lists.
Important point to remember:
It should be noted, that the user will have to ensure that the import process runs smoothly, import the lost following the order listed below. It is recommended to backup the company file.
- The user needs to first open the new company file. And ensure to log in as admin, and also log in the single user mode.
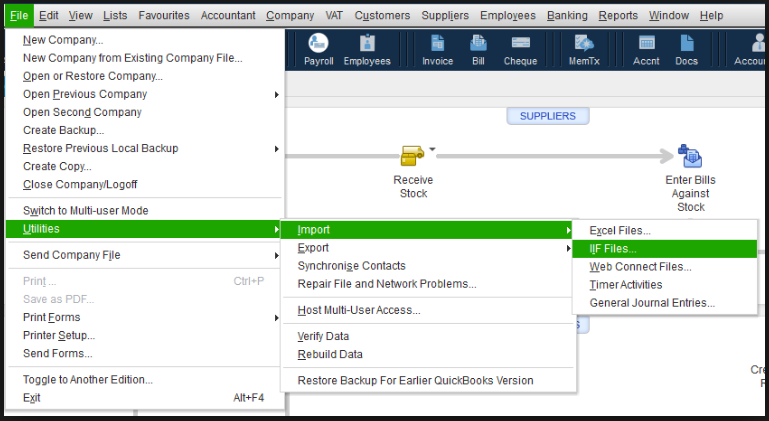
- After that, from the file menu, choose utilities tab
- Followed by, selecting import and clicking on IIF files

- The user will then have to import the chart of accounts
- And then, import the files in the order below:
- The user needs to import the lists that do not contain the information from other lists:
- Customer type list
- Vendor type list
- Class list
- Job type list
- Payment terms list
- Payment methods list
- Shipping methods list
- Customer message list
- To do notes
- The user is recommended to import the lists below one by one:
- Vendor
- Employee
- Other names
- Sales rep
- Item
- Price level
- Customer
- Budgets
- The user needs to import the lists that do not contain the information from other lists:
Step 4: Setting up the Opening Balance
- The last step in the entire process is to set up the opening balance.
The user needs to go through the record opening balance in QuickBooks desktop for further information.
Conclusion!
Towards the end of this article, we expect that the exporting lists from the old company file into a new data file will be successful. However, if you are stuck at any point of time or in case of any query, feel free to call us at any point of time at +1-844-719-2859. We are a team of 24X7 QuickBooks support team, who work round the clock to provide the best possible support services.


