Ways to fix can’t back up your QuickBooks Desktop data file issue with Intuit Data Protect Backup failed:
Seeking for quick fixes to can’t backup with intuit data protect error in QuickBooks? If yes, then your search ends over here, as this piece of writing will brief you with the most relevant strategies in rectifying the Intuit data protect backup failed: firewall or connection error. Often, when the user tries to backup with QuickBooks data protect and the application can’t access the file which is to be backed up, then such an error might be encountered. The backup failed error appears with the following warning messages:
| Error | Message |
| Intuit Data Protect Backup Failed: | Firewall or connection issue |
| Intuit Data Protect Backup Failed: | One of the configuration files is damaged or corrupted |
| Intuit Data Protect Backup Incomplete: | Files did not backup because they were open or not reachable |
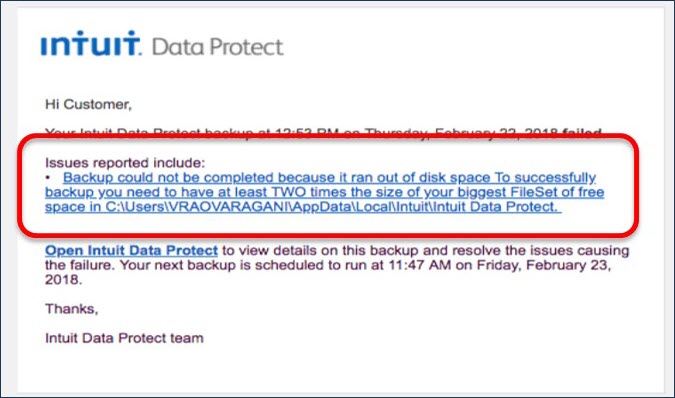
“Intuit Data Protect Backup Failed: Firewall or connection issue”
“Intuit Data Protect Backup Failed: One of the configuration files is damaged or corrupted”
“Intuit Data Protect backup incomplete: Files did not backup because they were open or not reachable”
Well, in such a scenario, the user can use the solutions below discussed and try getting rid of Intuit data protect to back up the files and folders. An important suggestion that should be kept in mind here, is to try backing up with the Intuit data protect after carrying out each of the solutions and head forward only if the error persists. To know more about this error and its related fixation steps, make sure that you stick around the article hereafter. You can also reach out to our technical support team at +1-844-539-0188, and let our technical support professionals help you with QuickBooks related queries.
You might also see: How to Upgrade Internet Explorer to Open QuickBooks Desktop?
What is Intuit Data Protect?
Before you dig in deep to learn the procedures to rectify can’t backup with intuit data protect error, it is better to have a brief knowledge about what Intuit data protect is all about. Well, Intuit data protect is well known as IDP and is a subscription service by Intuit, you can avail subscription for intuit data protect monthly. This subscription allows the user to back up essential business information online. What makes it even better is that the backup is taken on secure servers and this service can be integrated with QuickBooks 2016 and later versions. When the subscription of this service is activated, IDP takes the backup of the data automatically at the preferred timing each day. Moreover, it is capable of taking reinforcements of the information to the user accordingly. You can setup Intuit data protect by performing a couple of steps.
There are situations when this service fails to take the backup, and users often find this situation quite critical to handle. This situation arises due to a handful of factors, which we have mentioned later along with the fixes to the same. Thus, let us dive in together to get a better insight.
What causes the can’t backup with Intuit data protect error?
As we mentioned earlier, there are a handful of factors stimulating the Intuit data protect backup failed issue, out of which the most common ones are discussed in below:
- The very first reason can be if the operating system uses of some other file instead of NTFS, then this sort of error is probable to happen
- Also, if the ibuenghost.exe process is running on the local user on windows instead of the admin user
- Moreover, if the company file that is to backed up is already open on some other workstation, then this error might be seen
Also See: How to Convert a QuickBooks for Windows file to QuickBooks for Mac?
Fixes to can’t back up with Intuit data protect Login problem
The Intuit data backup failed error can be easily tackled using the below discussed steps and procedures. Let us explore each of the methods one by one:
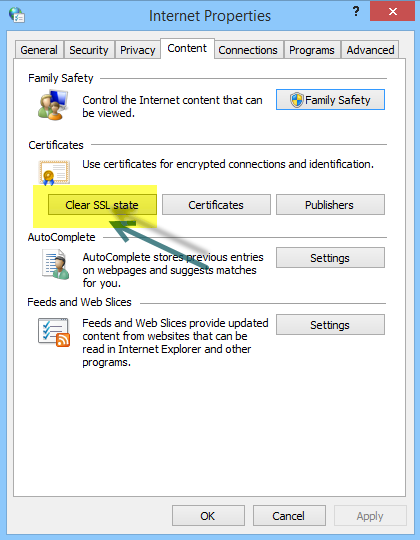
Procedure 1: Clearing the internet explorer cache, cookies, temporary files, and SSL state
The Intuit Data Protect user can try to fix the issue by clearing the internet explorer cache, cookies, temporary files, and SSL state. The steps involved in this procedure are as follows:
- The very first step is to open the internet explorer
- And then, navigate to the tools and choose the internet options. Also, note that if the user is unable to find the tools in the browser, then it is suggested to click on ALT to unhide the hidden tabs.
- The user is then required to move to the general tab and also select delete option
- Followed by, looking for the following boxes:
- Temporary internet files and website files cookies and website data
- History
- Form data
- InPrivate filtering
- Uncheck the preserve favorites and the website data box
- Now, the user should choose the delete option and then clear the items
- The user is then required to navigate to the content tab
- Lastly, the user needs to choose the clear SSL state and then click on ok tab
Procedure 2: Cleaning the space in the Intuit data protect Login
Even if you download Intuit Data protect successfully, you might face some issues. And if the first method didn’t work in fixing the issue, then another method can be to clean the space in the intuit data protect. The steps involved in here are as follows:
Step 1: To start with, the user needs to checking the intuit data protect version and also ensure that it is updated
Step 2: After that delete the backup folders after downloading the backed-up files first
Step 3: Now, reduce the backup file size, as it would clear the space
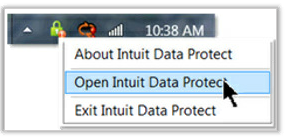
- This can be done by right clicking on the data protect icon and then select open intuit data protect
- Followed by selecting change backup settings
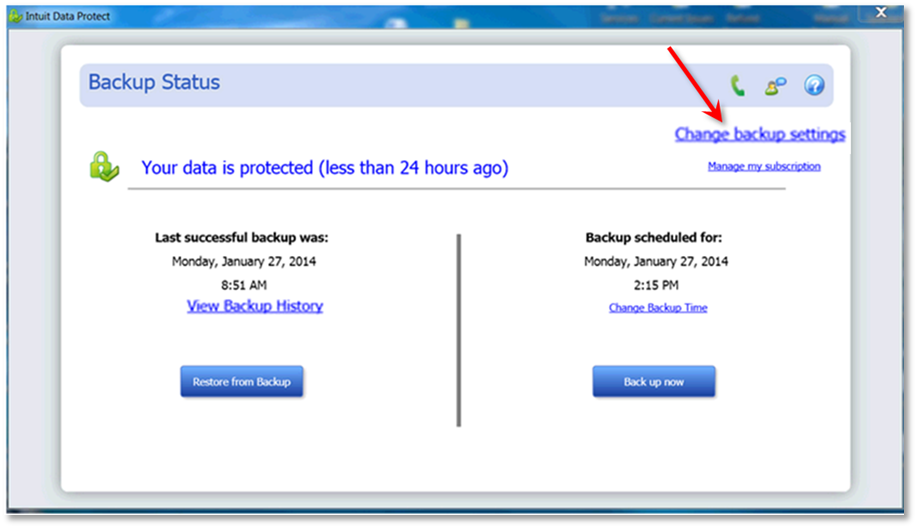
- After that, the user should untick on the files and folders that the user doesn’t need to backup
- Moving ahead, the user needs to hit on continue tab and then see exit backup settings
- The last step is to try to backup once more
Read Also: How to Resolve the Network Issues with QuickBooks File Doctor test Results?
Procedure 3: Ensuring that IBuEngHost.exe isn’t running as a windows user
IBuEngHost.exe is needed to run as a system user for Intuit data protect to work in a proper manner. The Steps involved in this particular process are as follows:
Step 1: Ensuring that the file is running as system
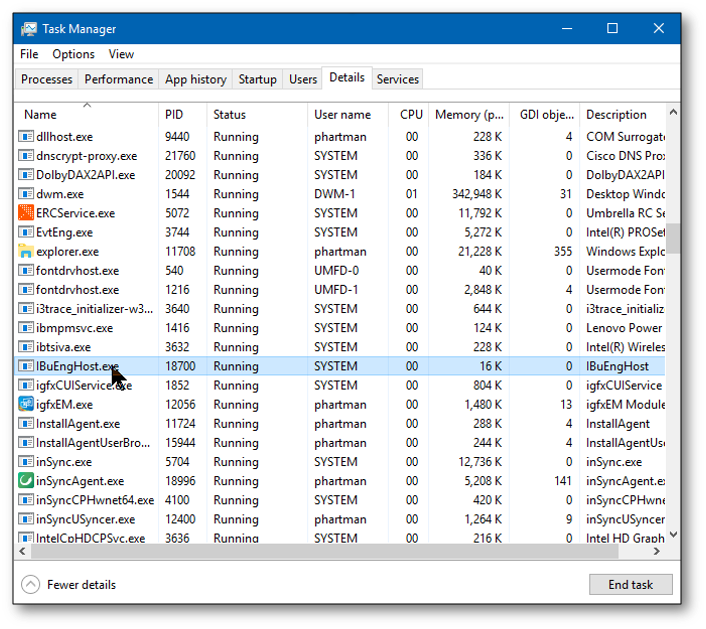
- Here, the user needs to right click the windows taskbar and also choose the start task manager
- The next step is to select the details tab and also look for IBuEngHost.exe. Also, the user should ensure that it has the user name as system and the status is running
Step 2: IBuEngHost.exe isn’t running as system
- Under this, the user needs to download a new installed for QuickBooks version. The user should note that the user needs to save the file where it can be spotted easily
- After that, navigate to the location where the installer was saved
- Now, the user should right click the installer and select run as admin
- The next step is to proceed with the re-installation process
- The user is also suggested to look for the IBuEngHost.exe in the task manager and also ensure that the status is running and also the user name is system
- The last step is to try backing up with Intuit data protect
Procedure 4: Using Intuit data protect diagnostic tool
The intuit data protect diagnostic tool can help in fixing the issue related to intuit data protect login. This tool assists in checking the system’s memory, disk space, windows components and intuit data protect version. Moreover, it also tests whether the user is able to connect to the backup service or not. The steps to be carried out in this are as follows:
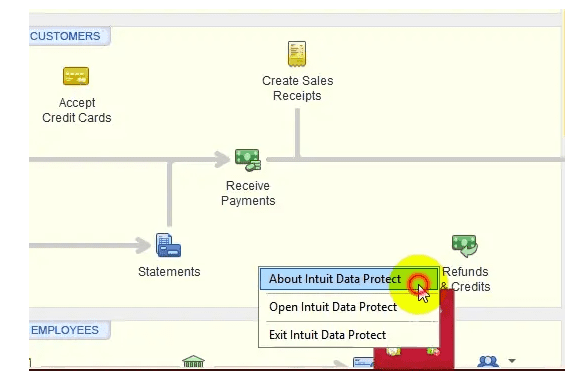
- Firstly, the user should right click the bank with intuit data protect icon and then choose about intuit data protect option. This would look like a green padlock
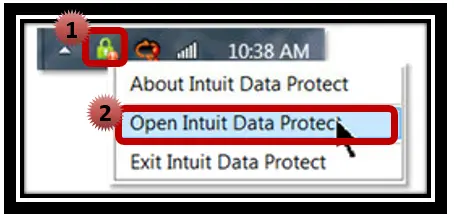
- The next step is to press Ctrl + F2 keys to open the intuit data protect diagnostic tool
- Also, the user should select run diagnostics. If the diagnostics tool detects an issue with a firewall or third-party security software, the user will require to reconfigure the software to permit access to intuit data protect files
- For further information related to configuring the security software and hardware, the user should check manufacturer’s website, and then add the following files for exceptions
- C:\Program Files(X86)\Common Files\Intuit\Data Protect\IntuitDataProtect.exe
- C:\Program Files(X86)\Common Files\Intuit\Data Protect\IbuEnghost.exe
- C:\Program Files(X86)\Common Files\Intuit\Data Protect\QBIDPServices.exe
If the tool detects any issue, an error window will display on the screen.
Procedure 5: Include Data Protection in the startup programs list
- You need to press and hold Win + R keys while pressing it.
- After that, enter MSConfig as the command.
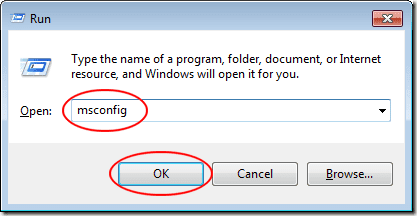
- You can put a checkbox next to each QuickBooks service under the startup tab.
- Click on ok tab and click on apply tab.
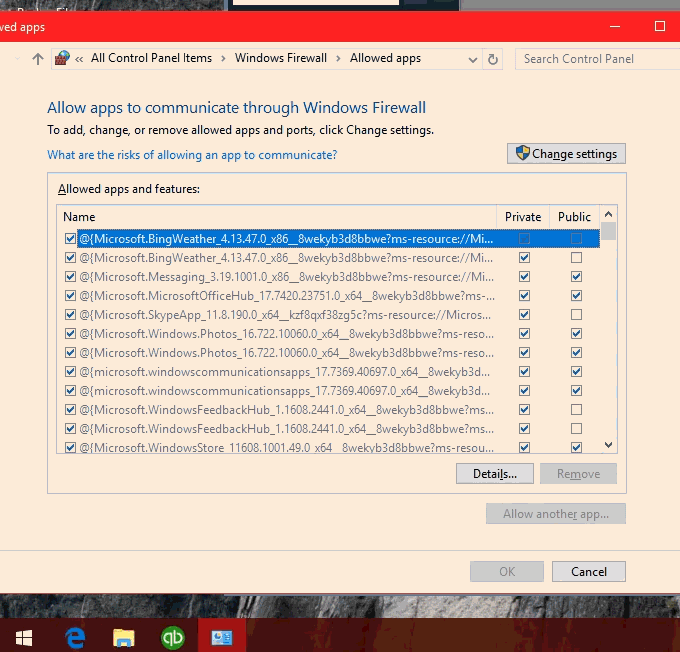
Procedure 6: Make sure that Windows firewall isn’t blocking the Intuit Data Protect
At times, windows firewall might block access for security purposes. In such a case, one might end up in failing to backup with Intuit Data Protect. Thus, it is important to check the firewall and ascertain that important files are allowed. Let us check out the steps involved in this procedure:
Step 1: Add Important files to the windows firewall
- The very first step is to press windows key and then enter the firewall in the search bar.
- Once done with that, head to allow an app through windows firewall option.
- Furthermore, you can choose the browse option and move to the path program files(x86)\Common Files\Intuit\ Data Protect.
- You now have to select QBIDPservice.exe, and choose the open option.
- The next step is to select network types and go for a private checkbox.
- This will ask you to click on the add tab.
- Repeat steps 4 and 5 for the files IBUenghost.exe and IntuitDataProtect.exe.
- If the message appears on the screen saying that the file exists, then you are ready to use it.
Note that the third-party antivirus software present on the system can also block the important files. Thus, you need to ensure that these files are permitted.
Step 2: Add Windows Firewall ports
Add windows firewall ports to fix the Intuit Data Protect backup failed issue. You can follow the below steps for configuring QuickBooks firewall ports and internet security settings.
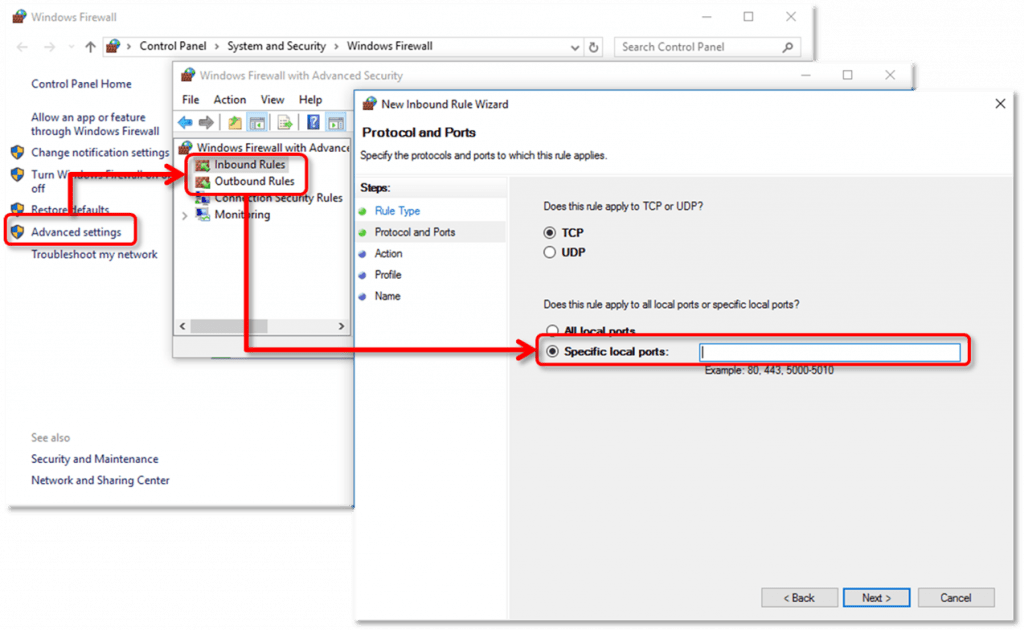
- You need to press windows tab to access the start menu.
- Enter the control panel in the search bar.
- Followed by navigating to the system and security option.
- You now have to go for the windows firewall program and select advanced settings.
- Once done with that, select inbound rules settings from the left side of the advanced settings window.
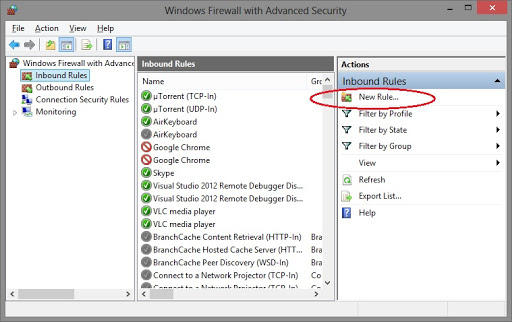
- You now have to choose new rule from the right side of the same window.
- And furthermore, enter the ports manually and click on the next tab.
- Incoming port: 80
- Outgoing ports: 443, 16841
- Perform the onscreen prompts till it closes.
- Perform the same steps for outbound rules.
Step 3: Add Intuit Data Protect to the trusted sites
In case the above steps didn’t work, then simply add Intuit data protect to the trusted sites:
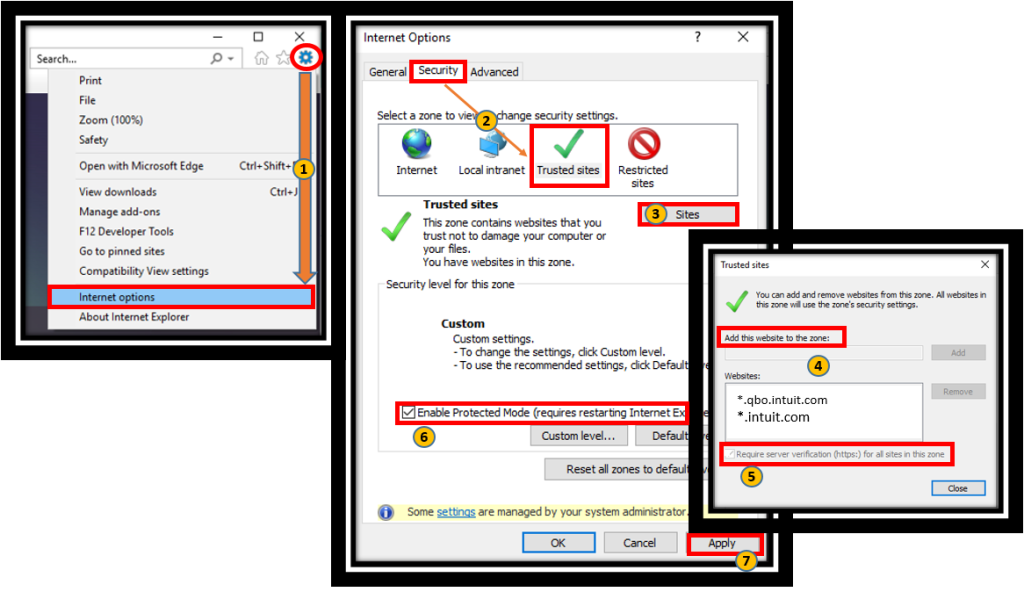
- You need to first press windows key and then enter Internet options in the search bar.
- After that, go for security and trusted sites option.
- Once done with that, you need to go for the sites option and add the following websites.
- You can either copy and paste or type it manually.
- Now, choose the add option for each of the sites:
- backup.com
- *.intuit.net
- *.intuit.com
- *.intuitdataprotect.com
- *.quickbooks.com
- workplace.intuit.com
- emerald.backup.com
- Now, ensure that the required server verification for all the sites in this zone is unchecked.
- Click on the close tab and also ok tab respectively.
- Make sure that you are able to open Intuit Data Protect certificate site or not.
- To avoid further backup errors, open the site.
- Lastly, try to backup with intuit data protect.
See Also: How to Fix QuickBooks Desktop Won’t Open Error After Windows Update?
Conclusion!
Reading this piece of information might have helped you in getting rid of the can’t backup with intuit data protect Login issue. However, if you bump into the same error again or if you need intuit data protect support, then discuss regarding the same with our QuickBooks desktop pro support team at +1-844-539-0188.
FAQs Related to Intuit Data Protect
You need to perform the steps below to restore files from IDP:
1. Move to QuickBooks home page first.
2. After that, open the backup status section in the lower right.
3. Once done with that, click on the view details link.
4. In the backup status page, click on restore a backup.
5. You will now have to choose the date and time of the backup you wish to restore and choose the file and click on the continue tab.
You can delete Intuit data protect from the startup folder and then right click Intuit data protect and choose delete tab.
To manually update Intuit Data Protect, you need to perform the steps below:
1. Right click the Intuit Data Protect Icon and select About Intuit data protect.
2. Once done with that, choose the update tab.
3. After the update is complete, click on ok tab.
Intuit Data Protect is basically a subscription service that can help in protecting data from loss or damage due to virus, laptop theft, file corruption, etc. Your files are automatically backed up online over the internet once a day, every day, at an automatically selected time to an offsite location.